6 minutes
Recommended Linux Tools
In this post, I’ve compiled a list of command-line tools that are worth exploring. This is not a complete list, but it should give Linux newcomers an idea of what is available within the community.
If you’re interested in more command-line tools, I would recommend browsing this website.
fish
Because I use Kubuntu, bash is the default shell; however, it lacks desired features. For example, fish provides the following out-of-the-box:
- Syntax highlighting
- Autosuggestions
- Manpage completions
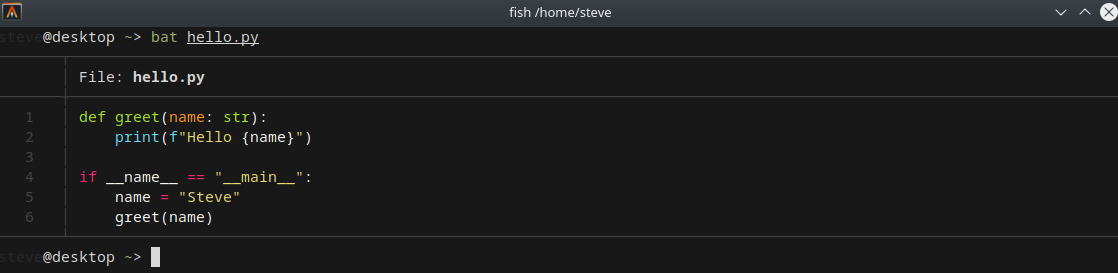
To demonstrate, bash has no syntax highlighting.

In this screenshot, fish provides syntax highlighting by default.

In this screenshot, fish provides autosuggestions based on user history.

And finally, fish provides manpage completions for generic commands.

Some people get wrapped up in the UNIX shell debate. For example, debating on whether fish is better than oh my zsh and vice-versa. To me, there is no right or wrong answer here. Instead, you should experiment with each shell and choose the one that fits your needs.
That said, the reason I chose fish was simple: it provides a simple out-of-the-box experience. In other words, I don’t have to configure the features mentioned above as they work automatically after installation. Conversely, oh my zsh requires downloading and configuring third-party plugins to receive the same functionality.
This is not to say fish is perfect. For example, fish is not POSIX compliant, which means some shell scripts that run on bash or oh my zsh may have to be tweaked before running on fish. Because of this, I recommend shell scripts be written in bash for cross-compatibility.
You can find fish here: https://fishshell.com/
bat
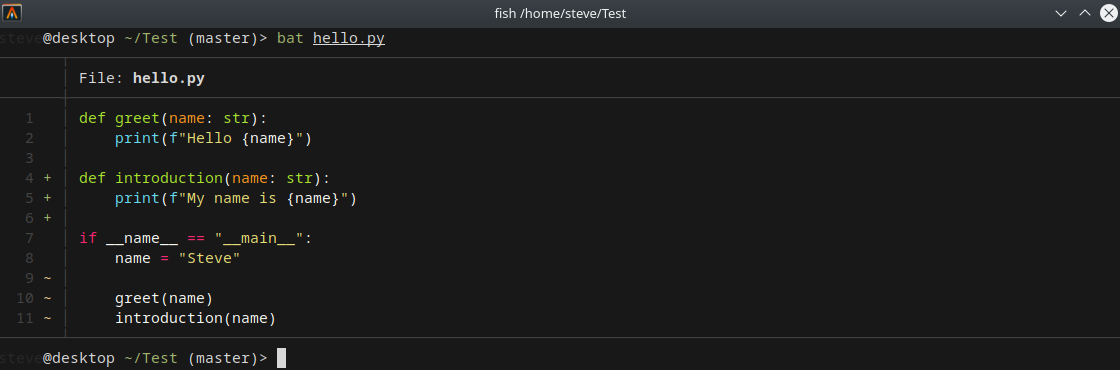
The next tool is bat, which is a cat(1) clone that combines syntax highlighting and git integration.
In this screenshot, you can see cat has no syntax highlighting.

With bat, syntax highlighting is provided for several programming and markup languages by default.
This tool also provides git integration by default (see left side column).
You can find bat here: https://github.com/sharkdp/bat
yadm
This tool provides backup, restore, and sync capabilities for dotfiles. You might be asking, “What are dotfiles?” In Linux, dotfiles are hidden files or directories within a filesystem. They are usually used to store user-specific application settings, such as vim, tmux, etc.
For example, ~/.vimrc is my config file for vim. The . before the filename is where “dotfiles” comes from. In this file, I have settings for show line numbers, line length, wrap lines, and so on.
It is common to track dotfiles with a version control system, and yadm makes this process simple. So, if I need to reformat my computer for whatever reason, I can clone my dotfiles over to the new system. Thus, I don’t have to reconfigure the entire system again.
The commands for yadm are like git. For example, yadm init, yadm add <filename>, yadm push, yadm clone <url> and so on. So, if you know git, the transition to yadm will be straightforward.
Why choose yadm over git?
Using git will track all files within a directory. So, if you don’t want to add a sensitive dotfile as an example, it will have to be added to a .gitignore file. Now, imagine setting up a .gitignore file for the entire home directory; it becomes complicated rather quickly. Therefore, I didn’t want to manage such a file and chose yadm because it’s fast and easy to use.
You can find yadm here: https://github.com/TheLocehiliosan/yadm
ranger
This tool acts as a file manager for the terminal. As a result, ranger allows you to navigate through your filesystem with keystrokes.
In this screenshot, you can see ranger has three panels. The far-left panel lists directories within my /home/steve/Notes/personal-notes/rust path, the middle panel lists files within the rust directory, and the far-right panel displays the contents for errors.md.
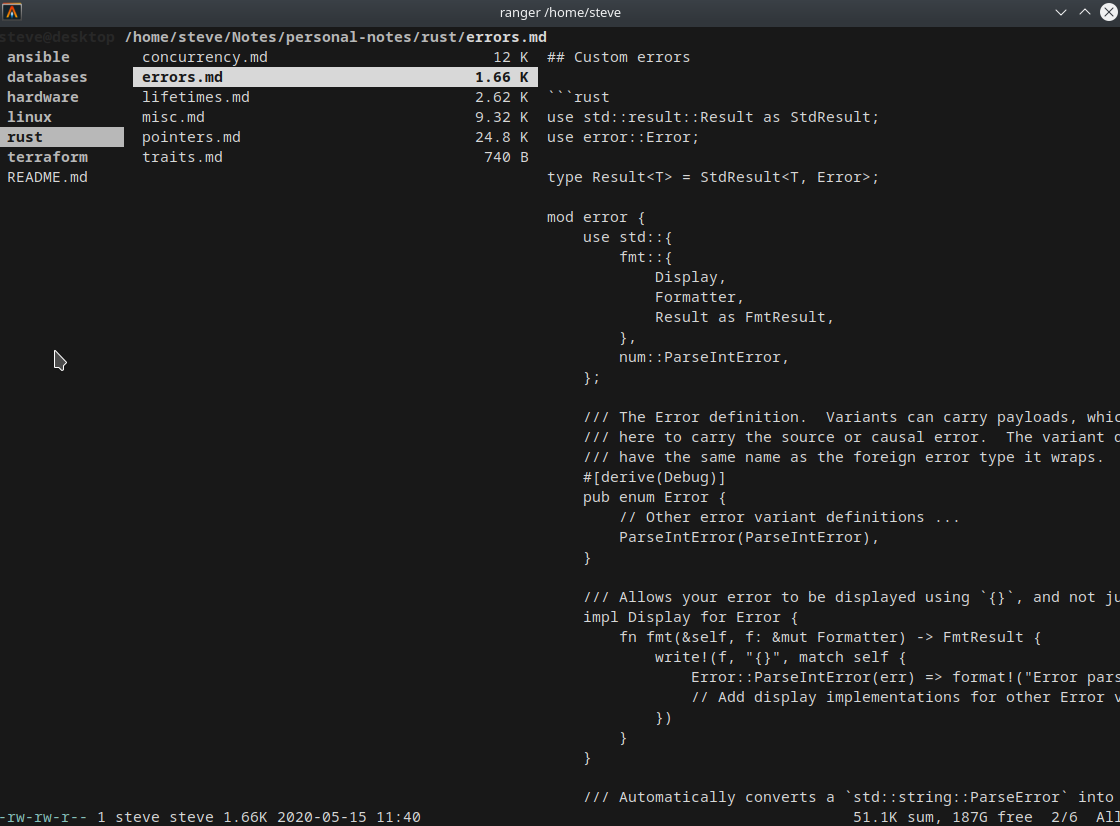
With ranger, I can move around the filesystem and view file contents without having to type cat <filename> or less <filename> repeatedly.
You can find ranger here: https://github.com/ranger/ranger
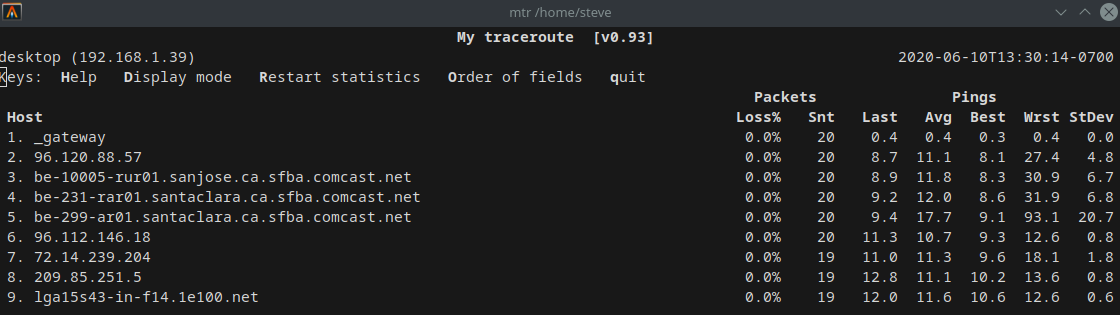
mtr
This tool combines traceroute and ping functionality into one network tool. Furthermore, it provides “real-time” stats, which are updated in one-second internals by default.
Interestingly, mtr provides two useful features:
-
You can send TCP SYN or UDP packets. For example,
mtr –-tcp google.comormtr --udp google.com. -
You can also generate reports. For example,
mtr --report -c 10 google.com > my_report.
This tool is great for diagnosing network-related issues.
You can find mtr here: https://github.com/traviscross/mtr
iftop
This tool produces a frequently updated list of network connections. By default, the connections are ordered by bandwidth usage.
In this screenshot, you can see iftop is comparable to top or htop.
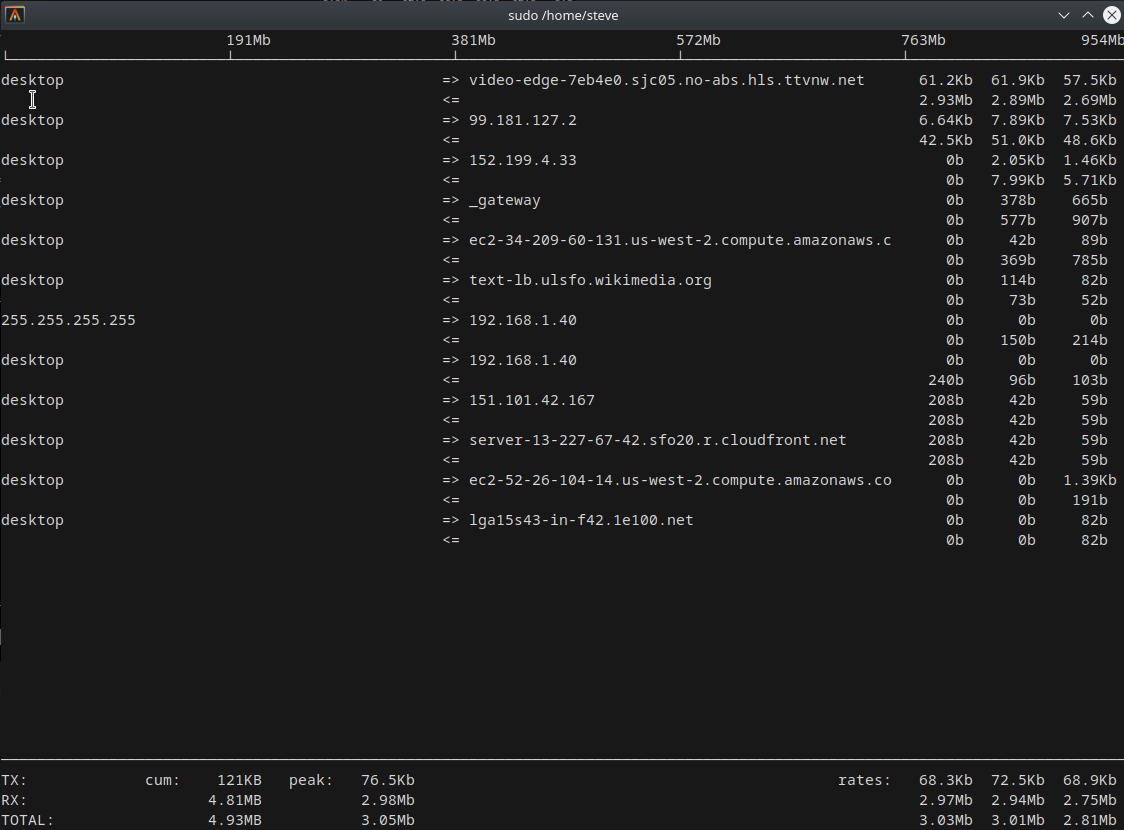
The arrow pointing right is traffic going out, while the arrow pointing left is traffic coming in. For example, the first line indicates that I averaged 61.2Kb of data in a 2 second period from my desktop to ttvnw.net servers. At the same time, ttvnw.net averaged 2.93Mb of data in a 2 second period from their servers to my desktop.
According to iftop documentation, each column represents the rate at which data has been sent and received over the preceding 2, 10, and 40-second intervals.
At the bottom, totals are shown, which include peak traffic over the last 40 seconds, total traffic transferred (after filtering), and total transfer rates averaged over 2, 10, and 40 seconds.
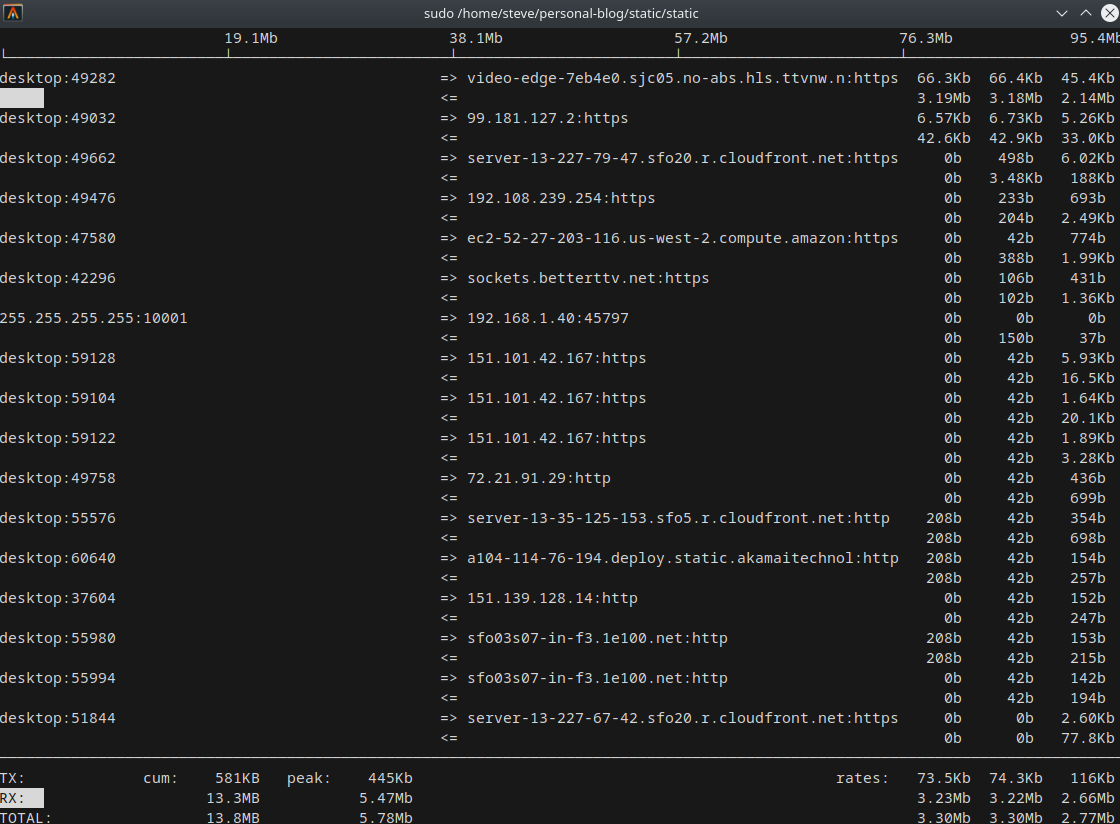
Furthermore, iftop allows you to display bandwidth usage by port numbers.
You can find iftop here: http://www.ex-parrot.com/pdw/iftop/
kmon
This tool provides a text-based user interface for managing and monitoring Linux Kernel modules.
In this screenshot, you can see coretemp is loaded, with details about the module itself.
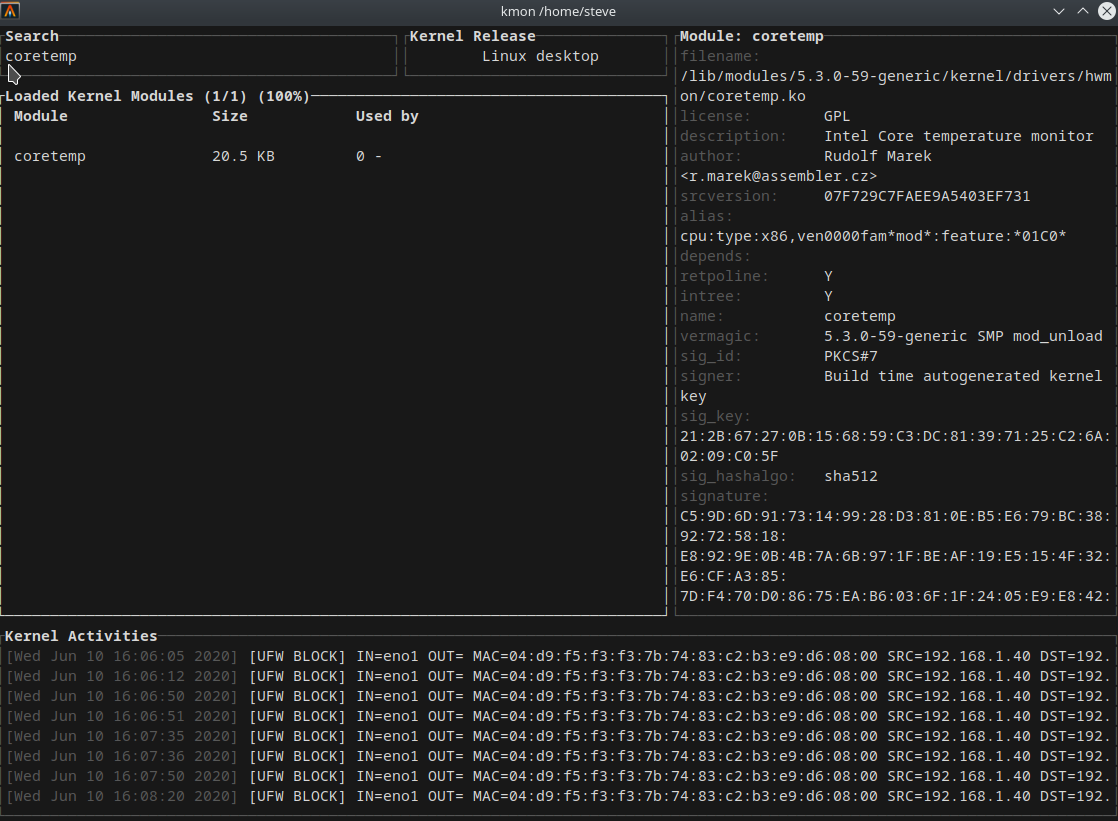
At the bottom, kernel activity is shown, which is derived from dmesg.
I haven’t used this tool, but it’s worth mentioning since it allows users to load, unload, and blacklist kernel modules. Furthermore, it may be useful for users who are troubleshooting their system (e.g., installing a wireless network card).
You can find kmon here: https://github.com/orhun/kmon
exa
So, I mentioned bat as a replacement for cat. In this section, exa is a replacement for ls, which provides additional features and better defaults. For example, it uses colors to distinguish file types and metadata, git integration, tree view, and many other features as well.
In this screenshot, exa is shown with --long, --header and --git flags.

The -N represents a new file, while -M represents a modified file for git.
In this screenshot, exa provides a tree view by using the --tree flag.

Some useful shell aliases to consider:
alias l="exa"
alias la="exa --all"
alias lt="exa --tree"
alias lg="exa --long --git"
alias ll="exa --all --long --grid"
You can find exa here: https://github.com/ogham/exa
ripgrep
This tool recursively searches directories and files for a regex pattern.
I should also mention that ripgrep is fast. In fact, in March 2017, Visual Studio Code moved their text search feature to ripgrep.
So, ripgrep is fast. Why else should I use this tool?
From my perspective, this tool is beneficial for the following reasons:
-
ripgrepignores hidden and binary files by default. Moreover, it will not search files ignored by.gitignore. -
ripgrepmakes it easy to search through code.
In this screenshot, I can list files that match the pattern MIT.

In this screenshot, LICENSE is no longer displayed because I added LICENSE to my .gitignore file.

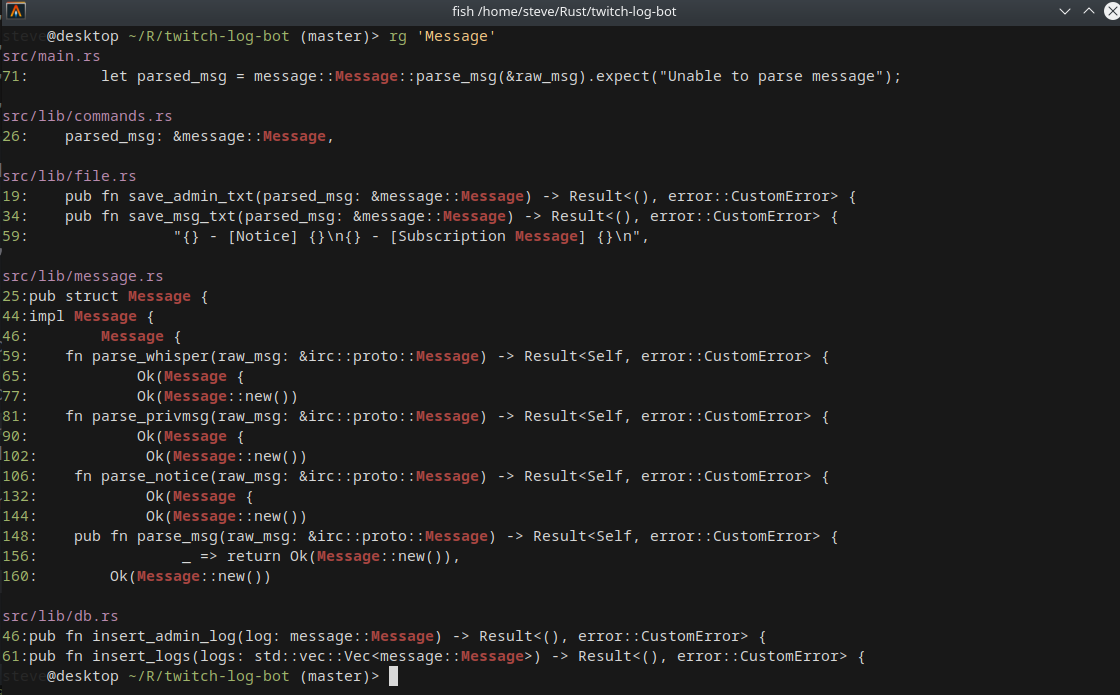
And finally, I can search through code that matches the pattern Message.
You can find ripgrep here: https://github.com/BurntSushi/ripgrep